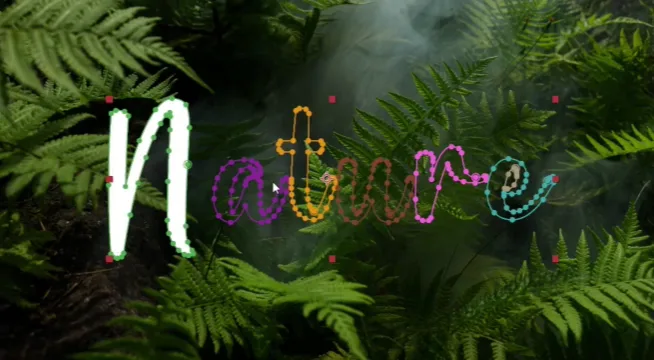
Innovative Ways to Use Handwriting Text Effect for After Effects Animation
The elegance of hand-penned letters brought to life with the dynamic energy of digital animation. As we dive into the nuances of creating a Handwriting Text Effect using After Effects, we uncover a realm where traditional artistry meets cutting-edge animation techniques.
Creating animated text in After Effects is an exciting journey into the world of digital animation and design. This blog post delves into the process, offering a step-by-step guide to crafting animated letters and words that mimic handwriting, a skill that can enhance various multimedia projects.
Handwriting Text Effect Animation in After Effects
Initially, you need an image to serve as your scene’s backdrop. The process begins by right-clicking on the image and selecting ‘New Composition from Selection’. This step ensures that your composition matches the image dimensions, which in our example is 1920 by 1080 pixels. If your image is of a different size, adjust accordingly to maintain visual harmony.
- Next, select the Type Tool and type your desired text onto the scene. Position and size it to fit well within your composition. The text initially appears as plain, which leads us to the next crucial step.
- For a handwriting effect, choosing an appropriate font is vital. Websites like DaFont offer a plethora of free handwritten fonts. Remember, the font should allow for clear separation between characters to facilitate the animation process. Overlapping characters can complicate the masking process
- Right-click on your text layer and select ‘Create Masks from Text’. This action creates a new layer where each letter is turned into a separate mask – a critical step for the handwriting animation.
- With your new layer selected, navigate to Effect > Generate > Stroke. This effect is the cornerstone of your animation. Adjust the ‘Paint Style’ to ‘Reveal Original’, which makes the text appear as if it’s being written in real-time.
- To animate, use the ‘End’ property in the timeline. Set the ‘End’ option to 0 at the start, creating a keyframe. Then, move further along the timeline and change the ‘End’ value to 100%. This change creates the animation effect of handwriting appearing on screen.
- For smoother animation, select the keyframes and press F9. Open the Graph Editor for fine-tuning. Adjusting the speed graph ensures a more natural handwriting appearance.
- To change the color of your animated text, use the Tint effect under ‘Color Correction’. This feature allows you to change the white parts of the text to any desired color, adding versatility to your animation.
- If the animation feels too fast, simply extend the duration between keyframes. This adjustment can be easily done by pressing ‘U’ on the keyboard to reveal active keyframes and dragging them as needed.

Conclusion
This technique offers a practical solution for creating handwriting animations. Whether it’s emulating chalk on a blackboard or a pen on paper, the method is adaptable to various creative needs. Remember, while this method is straightforward, it might not yield perfect results. Experimentation and practice are key to mastering this skill.


