Text Animation with Lines in After Effects
How to create a captivating text animation with lines. This effect adds a dynamic and modern feel to your text, enhancing the overall appeal of your video content. Whether you’re new to After Effects or looking to expand your skill set, this guide will walk you through the process step-by-step.
To begin, open a new composition in After Effects. The size of the composition can vary based on your project needs. Once the composition is open, add a text layer to the center. This will be the foundation of our animation.
Right-click on the text layer, hover over the ‘Create’ option, and select ‘Create Masks from Text.’ This action will create individual masks for each letter, allowing for more detailed animation control.
Applying the Stroke Effect
Navigate to the Effects panel and search for the ‘Stroke’ effect. Apply this effect to the text layer. In the Effect Controls panel, you will find several options to customize the stroke.
Ensure all masks are selected and then adjust the settings to wrap lines around the text. This step is crucial for defining the look of your animation.
Setting Keyframes for Animation
Move to the two-second mark on your timeline to set the initial keyframe. Use the letter ‘U’ on your keyboard to display all keyframed properties. Adjust the timeline to one second or the beginning and set the end value to zero.
As you play the animation, you will notice that the lines wrap around each letter sequentially from left to right. This creates a dynamic movement where each letter fills in before moving to the next.
Customizing Letter and Line Synchronization
To make each letter start and end simultaneously, disable the stroke sequencing. This will create a uniform animation across all letters.
If the animation speed isn’t to your liking, adjust the distance between keyframes. For instance, setting a keyframe at the first second can enhance the visual effect.
Integrating Opacity for Enhanced Effect
First, make the background layer visible. Then, use the ‘T’ key to access the opacity settings. Set keyframes for opacity to synchronize with the line animation, starting from zero and increasing to 100% as the lines complete.
Check the final look by playing the animation. This will give you a clear view of how the opacity interacts with the line animation.
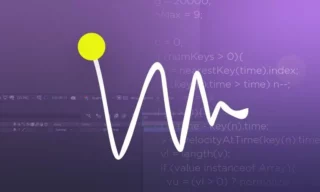
Utilizing the Graph Editor for Dynamic Animation
Select all keyframes and press ‘F9’ to soften them, making the animation smoother.
Open the Graph Editor and manipulate the keyframe curves. This allows you to control the acceleration and deceleration of the line animation, adding more dynamism to the effect.
Concluding
The final result showcases how effectively you can transform simple text into an engaging, animated graphic. Experiment with different backgrounds and settings to further enhance the effect.