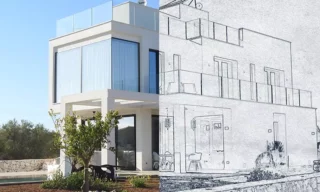
One-Click Realistic Drawings with Archi Sketch Photoshop Action
Today, I’m excited to share with you an efficient way to transform your photos into sketches using Photoshop. This method involves a paid action called “Archi Sketch,” which I find impressive for its working style. Let’s delve into how to use this action effectively.
Getting Started with Archi Sketch
You can obtain the Archi Sketch plugin from Envato Market, available on their website. Once you’ve located and purchased the action, you’ll find a download link in the description section. This action is specifically designed to convert images into sketch-like visuals, and we’ll explore the process step by step.
Downloading and Preparing the Files
After purchasing and downloading the Archi Sketch, you’ll receive a zip file containing three essential files: a pattern file (.pat), a brush file (.abr), and the action file itself. It’s crucial to upload all these files to Photoshop to ensure the action runs smoothly.
Firstly, open Photoshop and navigate to the file section. Here’s how you can upload the files:
- Brush File: Double-click to load it into Photoshop.
- Pattern File: Similarly, double-click to upload the patterns.
- Action File: In the action panel (which can be made visible under the window section), double-click the action file to add it to Photoshop.
Preparing Your Image
Before executing the action, ensure your image is set up correctly:
- Background Layer: The image must be opened as a background layer with a lock icon visible. If not, convert it by selecting ‘New’ and ‘Background from Layer’ in the layer menu.
- Merging Layers: If you have multiple layers, merge them into a single background layer by pressing Ctrl+E.
Using the Archi Sketch Action
The real magic begins when you start using the action. Here are the steps:
- Select Layer Brush: Look for an action named “Select Layer Brush.” This implies you need a layer named ‘brush.’
- Creating the Brush Layer: Make a new layer, name it ‘brush,’ and paint over areas you want to emphasize in your sketch.
- Executing the Action: With the ‘brush’ layer selected, hit the play button on the action. The action will process your image, which might take a few seconds to minutes depending on the photo’s quality.
Editing and Finalizing the Sketch
Once the action completes, you’ll see your image transformed into a sketch. The action creates several layers, each offering different editing possibilities:
- Layer Manipulation: You can manipulate these layers to alter the sketch’s appearance.
- Adjustment Section: Use the adjustment options for fine-tuning aspects like contrast and brightness.
Experiment with various photos to understand the action’s versatility. Remember to follow the same steps: merge layers, create a ‘brush’ layer, and execute the action.
If the action doesn’t work as expected, check if your image size is adequate or if Photoshop is set to a different language. The action may require Photoshop in English for optimal performance.
Conclusion
Archi Sketch offers a fantastic way to turn architectural images into sketches. Its ease of use and the ability to customize the output make it a valuable tool for photographers and designers.