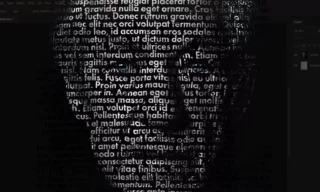
How to Place Text Behind an Object in Photoshop: Photoshop Secrets
Creating visually appealing graphics is essential in capturing the audience’s attention, especially in the realms of advertising banners, social media posts, and websites. One effective technique to enhance the aesthetic appeal of images is by placing text behind an object.
This technique fosters an illusion of depth, making the visuals more dynamic and professional. In this guide, we will delve deeply into the steps and techniques necessary to achieve this effect in Photoshop.
Preparing Your Workspace
Before you begin, ensure you have the necessary files ready in your Photoshop workspace. Primarily, you need two essential elements:
- The Image (where an object is present to place the text behind)
- The Text you wish to display behind the object.
Selection of the Object
The first crucial step involves selecting the object that you plan to place in front of the text. Photoshop offers a multitude of selection tools and methods, such as the lasso tool and select subject feature. For a quicker selection, the select subject feature is quite handy, but ensure the object is adequately highlighted for precise results.
Applying Masking Techniques
After selecting the object, the next step is to apply masking techniques. By creating a mask, you can work non-destructively, allowing for better flexibility and adjustments later on.
- Paint the mask where you need the text hidden, usually using black to hide and white to reveal areas of the object.
Positioning the Text
Ensure that the text is well-positioned according to the composition. The text should complement the object and the overall visual appeal of the image.
The choice of font, size, and color is also paramount. A bold font like Gotham Narrow can make the text stand out even if the image size is relatively small.
Fine-Tuning the Mask
Masks allow for precise editing and fine-tuning. If there are areas where the text is not properly hidden or revealed, you can always go back and edit the mask. Adjustments might involve:
- Painting over areas to hide or reveal more of the text.
- Inverting the mask if necessary, to switch the hidden and revealed areas.
Adding Depth with Shadows
To enhance the illusion of depth and make the text appear convincingly behind the object, consider adding shadows.
This can be achieved by creating a clipping mask and subtly painting shadows in appropriate areas, such as behind the object. The shadows should be meticulously applied, ensuring it aligns naturally with the lighting and perspective of the image.
Final Adjustments and Customizations
Once the text is perfectly placed behind the object, and shadows are applied for depth, you might want to make final customizations to improve the realism or style of your image. Consider these final touches:
- Adjust the opacity of the shadows for a more subtle or pronounced effect.
- Explore gradient effects, playing with darker and lighter shades to enhance the dimensional illusion.
In mastering the technique of placing text behind an object in Photoshop, you unlock a powerful tool to enhance your visual content, making it more professional, attractive, and engaging.