Face Tool in Photoshop: The Ultimate Facial Editing Tutorial
Photoshop, known for its vast array of editing capabilities, offers a particularly intriguing feature: the Face Tool. But what exactly is this tool, and who stands to benefit from its use? The Face Tool is a dynamic Photoshop component designed for rapid and straightforward editing of facial features.
Utilizing facial recognition technology, it identifies different facial attributes, allowing for individual modification. This tool is invaluable whether you’re a professional portrait photographer or simply want to enhance your personal photos.
How To Use The Face Tool
To begin using the Face Tool, start by opening the image you wish to edit. Then, navigate to Liquify under the Filter menu. If you’ve used Liquify before, you’ll be familiar with the window that pops up. However, recent versions of Photoshop have integrated the Face Tool directly into this window.
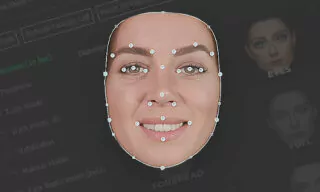
Upon loading your photo and accessing the Liquify feature, Photoshop’s advanced facial recognition technology automatically recognizes facial features.
When you hover the mouse cursor over specific facial regions, such as the eyes, markers will appear around them. These markers are also visible around the nose, mouth, and other facial areas. By interacting with these markers, you can make precise edits to these features.
On the user interface’s right side, numerical values correlate with these adjustments. For example, changing the eye size involves scrolling sliders to adjust their dimensions. These edits can significantly alter the aesthetic appeal of your photo, offering modifications to the eyes, nose, mouth, and overall facial shape.
Advanced Editing Features
The Face Tool doesn’t just stop at basic resizing. You can also rotate and reposition the eyes, adjust the distance between them, and even modify the nose’s position relative to the mouth.
The tool allows for the enlargement or reduction of the nose size, adjustments to the mouth’s width, and alterations to the thickness of the upper and lower lips.
Adding a smile is also possible, though it may not suit every photo. Additionally, you can adjust the chin and forehead’s width and length, providing a comprehensive range of editing options.
Applying and Revisiting Your Edits
Once you’re satisfied with your edits, click OK to apply the changes to your photo. If you’re working on a smart object, these edits will be added as a filter. This feature allows you to double-click the filter at any time to revisit and update your edits, offering flexibility and convenience.
Conclusion
This tutorial has explored the expansive capabilities of Photoshop’s Face Tool, particularly for editing portrait photos. It’s a powerful feature that can transform the way you approach photo editing, making it an essential tool for both professionals and enthusiasts.