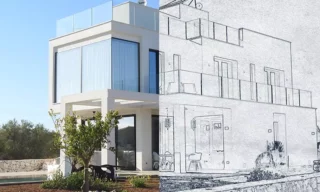
Transform Photos to Pencil Drawing Quickly in Photoshop
Transforming a photograph into a pencil drawing is a creative way to give a unique and artistic touch to your images. With Photoshop, this process is not only achievable but can be done quickly and effectively. In this detailed guide, we’ll walk through each step, ensuring that even beginners can follow along and create stunning pencil-drawn effects.
Opening Your Photo in Photoshop
To begin, open the photograph you wish to transform in Photoshop. This photo will serve as the base for our pencil drawing effect.
Next, duplicate your photo layer. This can be done by pressing Ctrl + J or by dragging the background layer onto the new layer icon in the Layers panel. This duplication is crucial as it allows us to apply effects non-destructively.
Rename the newly created layer to something indicative of its purpose, such as “Pencil Drawing” or “Drawing Layer.” This helps in organizing your layers, especially in more complex projects.
Right-click on the duplicated layer and select “Convert to Smart Object.” This step is essential for applying editable filters and adjustments, giving you more flexibility in your editing.
Converting to Black and White
Since pencil drawings are monochromatic, convert your photo to black and white. Reduce the saturation to achieve this effect:
- Click on the “Hue/Saturation” icon in the Adjustments panel.
- In the Properties panel, drag the Saturation slider to the left.
If the Properties panel is not visible, ensure it is activated by checking the “Properties” option at the bottom of the “Window” menu.
Adjusting Blending Settings
Change the blending mode of the duplicated layer to “Color Dodge.” This step will begin to transform your photo into a drawing-like appearance.
Press Ctrl + I to invert the layer. This can also be done through the “Image” menu, under “Adjustments,” then selecting “Invert.” The inversion is a key step in creating the pencil drawing effect.
Applying Gaussian Blur
The final step involves applying a blur effect to soften the image:
- Go to “Filter” > “Blur” > “Gaussian Blur.”
- A dialogue box will appear, allowing you to adjust the blur level. Start with a low value and increase gradually until you achieve the desired pencil drawing effect.
Remember, the degree of blur will affect the realism of the pencil drawing. Avoid excessive blurring, as it might make the image lose its photographic qualities.
If the result is not satisfactory, you can easily adjust the settings:
- Double-click on the Gaussian Blur effect in the Layers panel. Since the layer is a Smart Object, these adjustments are non-destructive.
- Adjust the blur until you’re happy with the appearance.
For a more striking effect, remove or paint the background white. This step enhances the pencil drawing effect, especially in photos with clear, isolated subjects.
Conclusion
You’ve now transformed your photo into a pencil drawing using Photoshop. This technique is fast and effective, offering a creative way to present your images.