Turn Day Photos to Night in Photoshop
In this video we’re going to make daytime photos look like nighttime photos and then we’re going to add a moon image.
Day to night in Photoshop
There is a very simple way for day into night effect in Photoshop.
- After opening our photo, I click on the Adjustment button in the Layers panel and select the Color Lookup option.
- After selecting Color Lookup, you will see these options in the Properties panel.
- There will be three options. Let’s click on the top one and select Moonlight.
When we select this, as you can see, it will look like a photo taken in the evening. This process is that simple.

Adding moon to the image
Now let’s add a moon image to the background. Let’s try to get a slightly more beautiful image with the moon shining. When you search for Moon on the internet, you will find many such images.
Remove background on the image
Since this image is surrounded by black, I will first need to remove it.
- I select the ellipse selection tool and draw a circle somewhere in the middle by pressing Alt and Shift on the keyboard. Let’s center the circle.
- Once the moon itself is completely selected, again with our layer selected, let’s rename it, I click on the Mask icon.
- When I click on the Mask icon, the selected parts will stop and the black parts in the background will disappear.
Convert image into a smart object
Now I can convert this object into a smart object.
- I right click and select Convert to Smart Object, now it’s a smart object.
- I select the selection tool again, press Ctrl + T on the keyboard and that opens Transform.
- We can resize the moon. You can change the position of the moon.
Making adjustments on the moon image
Let’s try to give it the brightness of the moon. We’ll do this in Blending Options.
- I right click on the layer, select Blending Options. The moon is very clear, very detailed right now. We’re going to make it a little bit more white.
- I click on Color Overlay, the Blending Mode will be normal and you can see it like this. I’m going to lower a little bit, the Opacity value.
- We’re going to lose a little bit more detail. And then I’m going to check Outer Glow so that we can give the brightness in the background.
- We need to make it white. I click on it and select white.
- I may need to increase the Opacity value a little bit here. Let’s increase the brightness in the background and the Size value at the bottom a little bit so that it stands out more, you can leave it however it looks good to your eyes.
This is how we aim to have a glare in the background. If it’s OK, we can close by clicking the OK button. Then you can change the position of the moon as you like.

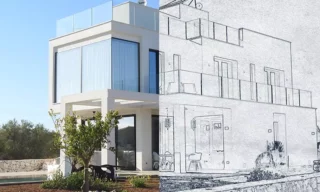
I want this moon image to be visible from behind the photo, behind the building here. With a little more effort, you can decouple the trees, separate the sky and make the moon image visible from behind the trees.
- I’m taking the Lasso tool, it’s going to be a purely purposeful selection. Since I want to remove it from here, I only select this place and I will make a selection so as not to cross the border of the Moon image.
- After making the selection, I click on the mask button again. When I click on the mask button, you will see a chain between the layer and the mask.
- I click on this chain, first of all I unlink the relationship by clicking on this chain.
- Then I click on the area on the left side.
See, when I click on this, the selection of this is clear. When I click on this one, the selection of this one is clear. When I click on the one on the left, I will be able to move the object here.
With the Move Tool, I move the Moon image downwards. See, when I move it, it will be behind the structure I just selected. If you prefer not to put it in the center, you can associate the photo with the moon image a little bit more this way.