Object Along Path Animation in After Effects
Creating motion for objects along a predefined path in Adobe After Effects is a versatile and essential skill for any animator or motion graphics designer. This detailed guide will take you through the steps to animate objects like a rocket, fish, or car along a specific path, ensuring they follow the line’s direction and angles.
Opening After Effects and Setting Up New Composition
To begin, launch After Effects and select ‘New Composition’. Name the composition, for example, “Path” to indicate its purpose for line animation. Set your composition’s dimensions to 1920×1080 pixels for standard high-definition output. For duration, a 30-second workspace is sufficient, but you can adjust this later. Initially, set the background color to black, which can be changed as needed.
The first step in the animation process is to add the object that will move along your path. Import a PNG file with a transparent background (JPEGs do not support transparency). After importing, adjust the background color if necessary by accessing composition settings (shortcut: Ctrl + K).
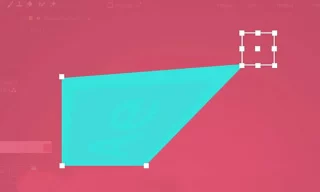
With the Pen tool (shortcut: G), draw your desired path on the workspace. This path will dictate the object’s trajectory. You can modify the path’s shape and points at any stage.
Mapping Object to Path
After drawing the path, copy it from the shape layer it creates. Then, paste this path into the position property of your object’s layer. This action will automatically create keyframes that correspond to the points on your path.
Manipulate these keyframes to control the object’s speed along the path. Moving keyframes closer or further apart alters the animation’s pace. Remember, you can always edit the path points for further refinement.
Orienting Object Along Path
To ensure your object (e.g., a plane) aligns with the path direction, use the Auto-Orient feature. Right-click on the object layer, select Transform > Auto Orient, and choose ‘Orient Along Path’. Adjust the rotation manually if needed for better alignment.
Adding Additional Points to Path
If you want to modify the path, use the Add Vertex tool (found under the Pen tool) to add new points. Be careful not to overcrowd the path with points, as this can lead to erratic object motion. Adjust these new points and their corresponding keyframes for a smooth, natural animation.
To achieve a more natural movement, use the selection tool to adjust the curvature of the path. Hold the Alt key to symmetrically adjust the path’s handles for a smoother transition.
Beyond a single-colored background, you can enhance your animation by incorporating additional images or layers. This step adds depth and context to your animated object.
Conclusion
Animating objects along a path in After Effects opens up a world of creative possibilities. By following these steps, you can create dynamic, natural-looking motion for any object in your compositions.