How to Make an Animation in Blender? Complete Beginners Guide
Welcome to the world of animation in Blender! This blog post is an introductory tutorial designed to help beginners understand the essentials of creating animations in Blender. We will delve into the basics, covering how to give basic movements to objects and the crucial concept of FPS (frames per second).
- Understanding FPS (Frames Per Second)
- Navigating the Timeline
- Creating Your First Keyframe and Animation
- Setting Up Your First Keyframe
- Animating Movement
- Utilizing the Space Key
Understanding FPS (Frames Per Second)
Before diving into animations, it’s essential to grasp the concept of FPS. FPS stands for frames per second, a critical setting in animation that dictates how smooth your animation will appear. Blender’s default setting is 24 FPS, visible in the Output Properties screen as Frame Rate.
Navigating the Timeline
The timeline in Blender is your storyboard, where keyframes and animation sequences are laid out. By default, Blender’s timeline is set to 250 frames. Adjusting the FPS changes the animation’s speed, with 24 FPS meaning the animation completes in one second.
Creating Your First Keyframe and Animation
Animation in Blender is built upon keyframes. Keyframes are the cornerstone of animation, marking the start and end points of any motion.
Setting Up Your First Keyframe
- Begin by selecting the move tool and your object.
- Click on the keyframe icon to activate automatic keyframe insertion when moving the object.
- As you move the object, Blender automatically creates a keyframe on the timeline, recording the object’s position.
Animating Movement
- Move the timeline forward (e.g., to frame 50).
- Alter the position of the object. Blender automatically adds another keyframe.
- When you replay the scene, the object moves from the first to the second keyframe, creating a basic animation.
Utilizing the Space Key
The Space key is a shortcut for starting and pausing the animation playback in the scene.
Advanced Keyframe Techniques
Inserting Keyframes
- Right-click on the object and select ‘Insert Keyframe’, or use the shortcut ‘I’.
- You’ll find options like location, rotation, and scaling – basic attributes for motion.
Animating Location and Rotation
- Use ‘I’ to select both location and rotation for keyframing.
- Move and rotate the object, then add a keyframe at the new position.
Including Scale in Animation
- Move to a previous frame, press ‘I’, and select location, rotation, and scale.
- Resize the object at a different frame and add a keyframe.
Keyframing Material Properties
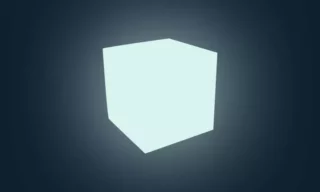
Animating Glow Effects
- Open the Material Properties, change the surface to Emission, and activate Bloom effects in Render Properties.
- Hover over the Strength value, press ‘I’ to insert a keyframe, and adjust as needed.
Keyframe Color Changes
- Adjust the color and press ‘I’ to keyframe the color change.
- Play the animation to see the color and glow changes over time.
Understanding Keyframe Colors
Blender uses color coding to indicate the status of keyframes:
- Yellow: Indicates a keyframe is set for the current frame.
- Green: Indicates the absence of a keyframe at the current frame.
Conclusion
This basic guide covers the foundational aspects of creating animations in Blender. By understanding keyframes, timeline navigation, and material properties, you can start bringing your 3D objects to life. techniques