Enhance Your 3D Projects with Blender’s Free Plant Library Addon
|
In this detailed tutorial, we’ll explore the Plant Library plugin, a highly acclaimed nature pack for Blender users. This plugin stands out with its free access and exceptionally detailed models, perfect for adding natural elements to your 3D projects.
Index
- Practical Example: Utilizing Plant Models and Textures
- Basic Scene Setup
- Lighting Configuration
- Adding and Customizing Plants
- Adding Additional Elements
- Adjusting for Realism
- Fine-Tuning Object Placement
We’ll guide you through the process of downloading, activating, and using this plugin in a step-by-step manner.
Downloading and Activating the Plant Library Plugin
Steps for Downloading
- Access the Blender Market by registering and logging in, which is a free process.
- Ensure your Blender version is compatible with the plugin. Pay attention to the minimum version requirement.
- Despite being free, the plugin requires you to go through a ‘purchase’ process. Simply add it to your cart and complete the order at no cost.
- Post-purchase, download the plugin based on your rendering engine in Blender – Octane or Cycles/Eevee.
- The plugin comes as a RAR file, which you need to extract using any standard compression software. The extracted file will have a .blend extension, recognizable by Blender.
Project File Exploration
- Double-clicking the blend file will reveal a project file listing all available models (blends).
- We’ll focus on using the plugin as an asset, not within a project file setup.
Setting Up the Plugin in Blender
Adding Asset Library
- In Blender, go to
Edit>Preferences. - Select
File Pathsand find theAsset Librariessection. - Paste the folder address of the downloaded plugin and add it as an Asset Library.
- Optionally rename the library for ease of identification.
- Save the settings to avoid repeating these steps in future projects.
Using the Asset Browser
- Convert the timeline area into an Asset Browser for easy access to the plugin’s assets.
- Choose the Plant Library from the dropdown menu to display all available plant models and textures.
- Utilize the filtering features to narrow down to specific types of plants, stones, or textures.
Practical Example: Utilizing Plant Models and Textures
Basic Scene Setup
- Start with a new plane, enlarged to your preference.
- Drag and drop floor textures from the Material folder in the Asset Browser onto the plane.
Lighting Configuration
- Select Cycles for rendering, adjust the Sun Intensity and Strength in World Properties for realistic lighting.
Adding and Customizing Plants
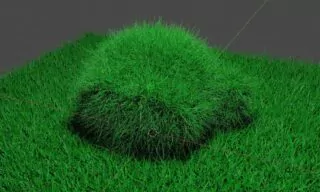
- Drag plants from the Asset Browser onto the scene.
- Use the
Mkey to add plants to a new collection for organization. - Utilize the Particle Properties panel to add and adjust plants on the scene.
- Modify the scale and number of plants for a realistic look.
Adding Additional Elements
- Follow similar steps to add rocks, creating a diverse and natural environment.
Adjusting for Realism
- Use the scale randomness feature to add variety to the plant sizes, enhancing realism.
Fine-Tuning Object Placement
- Adjust the axes and rotation of the objects to ensure correct placement and orientation.
Extending the Plugin’s Use Beyond Ground Coverage
Experimenting with Different Objects
- Experiment by applying the plugin’s assets to different objects like cubes, adding plants and materials to them.
Creating Dynamic Scenes
- Manipulate the Particle Properties to create dynamic scenes. For instance, changing the number of particles or their distribution can drastically alter the appearance of your plant-covered surfaces.
Enhancing the Scene
- Incorporate different types of plants and rocks to create a more diverse and natural-looking environment.
- Apply textures not only to the ground but also to other objects in the scene to achieve a cohesive look.
Conclusion
This tutorial has walked you through the complete process of using Blender’s Plant Library plugin, from downloading to creating a rich, natural scene. Whether you’re looking to enhance your 3D landscapes, architectural renders, or any other project, this plugin offers the tools and flexibility to bring your visions to life.
Trending


Look at These!