How to Add Handheld Camera Shake Effect in Premiere
In this blog post, we will delve into the intriguing process of transferring shake effects from a handheld video to a video shot on a tripod using Adobe Premiere. This technique is pivotal for filmmakers and video editors who want to add realistic handheld camera movement to their stable, tripod-shot videos. The process involves several steps that will transform your static shots into dynamic, life-like scenes.
What is Video Shake Transfer?
- Definition: Video shake transfer is the process of applying the natural movement from a handheld video to a static video shot on a tripod.
- Purpose: This technique is used to add a realistic, handheld feel to static shots, making them more dynamic and engaging.
Before we begin, ensure you have your project open in Premiere. You’ll need two types of videos: a stable video shot on a tripod and a shaky, handheld video. The goal is to transfer the shake from the handheld video to the stable one.

Step-By-Step Process
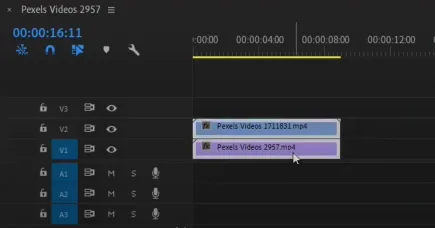
- Start by placing the shaky video on top of the stable video on your timeline. This creates a video stack, with one video layered over the other.
- Next, select both videos, right-click, and choose the ‘Nest’ option. Nesting in Premiere is akin to creating a smart object in Photoshop; it combines selected objects into a single, editable clip.
- Now, open the effect panel. If it’s not visible, activate it via the ‘effect options’ under the ‘window’ tab. Search for the ‘Warp Stabilizer’ effect, found under ‘Distort’, and drag it onto the nested clip.
- Warp Stabilizer is typically used to stabilize moving footage. However, we’ll use it inversely. In the effect’s properties, set the ‘Result’ to ‘No Motion’ and the ‘Method’ to ‘Position, Scale, and Rotation’. This action stabilizes the top, shaky video as much as possible.
- Double-click the nested clip to delve into its details. Inside, you’ll find that the Warp Stabilizer effect applied to the previous nest clip isn’t visible. Select and delete the top, shaky clip, leaving only the static, bottom video.
- Return to the original sequence and play the video. You’ll notice that the shake characteristics of the handheld video are now applied to the stable clip. This method effectively transfers the dynamic, exciting feel of handheld footage to your static tripod shots.
Conclusion
This technique is a game-changer for video creators. By using your own outdoor footage or any handheld video, you can impart a sense of realism and movement to tripod-shot videos. This skill not only enhances your video editing arsenal but also opens up creative possibilities for your projects.


