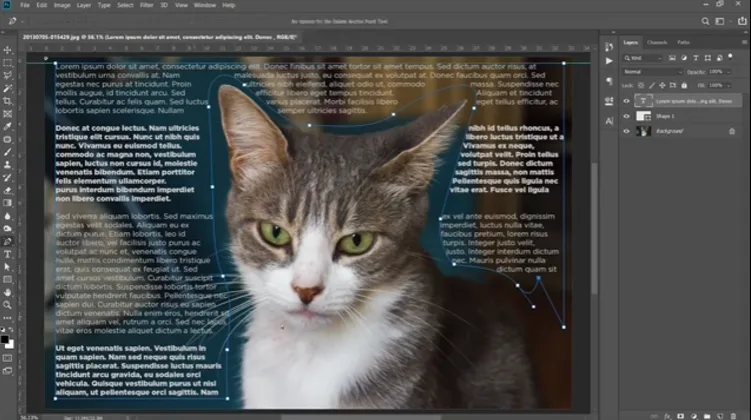
How to Warp Text Around an Image in Photoshop
The art of text wrapping around shapes in Photoshop stands as a beacon of creativity, beckoning designers to explore its depths. This technique, a staple in the realms of newspapers and magazines, transcends the traditional boundaries of text and image, merging them into a seamless dance of visual harmony.
Have you ever wondered how these intricate designs come to life, how text fluidly bends and weaves around contours, creating a mesmerizing interplay of words and shapes?
This method adds an element of sophistication and creativity to layouts, making them more engaging and visually appealing. In this tutorial, we will explore how to effectively use this technique in Photoshop.

Creating and Defining the Shape
To begin, open the image you wish to work with in Photoshop. Then, select the Pen Tool (shortcut ‘P’) and make sure to choose ‘Shape’ in the properties panel. This is crucial because what you’re creating is a shape around which the text will wrap.
- The next step is to draw the outline of the shape where you want your text to wrap around. You can choose to either paint the inside of this shape black or leave it transparent, depending on your design needs. Add curved or straight lines to define the area within which the text will appear. This doesn’t need to be overly detailed; a basic outline will suffice.
- After outlining your shape, select the Text Tool. Move your cursor inside the drawn shape – it should change appearance to indicate that it’s ready for text entry. Click inside the shape to start typing your text. At this point, you can paste in your desired text, such as lorem ipsum, for placeholder purposes.
- This is where your creativity can shine. You have the freedom to change the font style, size, and spacing of your text. This includes adjusting the text alignment and formatting to fit perfectly within your drawn shape. For instance, you can switch from uppercase to lowercase, change the font color, and even adjust the thickness of the text to make it visually appealing.
- For more detailed editing, access the paragraph settings from the Window menu. Here, you can experiment with text alignment, such as centering, right-aligning, or justifying the text. Adjusting hyphenation is also key to controlling how words break at the end of a line, ensuring a smooth text flow.
You might encounter issues like misaligned text or uneven text flow. To fix this, use the ruler tool for precise alignment and the Direct Selection Tool to adjust anchor points as needed. You can also add or remove points to modify the shape’s contours for a more natural text flow.
Conclusion
In this tutorial, we’ve covered how to wrap text around custom shapes in Photoshop. This technique opens up a world of design possibilities, allowing for more creative and engaging layouts. Practice these techniques with various shapes and layouts, such as around portraits, products, or architectural elements, to see how text wrapping can transform your designs.


