Synchronize Video and Audio in Adobe Premiere: Essential Tips for Flawless Editing
Creating high-quality videos often involves synchronizing audio and video from separate sources, a common challenge for videographers and content creators. Adobe Premiere, a leading video editing software, provides robust tools to tackle this issue.
In this blog post, we’ll delve into how to effectively synchronize video and audio from two different sources using Adobe Premiere, enhancing the quality of your final product.
Understanding the Need for Synchronization
In professional video production, it’s common to record audio and video separately. The reason is simple: dedicated audio equipment typically captures better sound quality than the built-in microphone of a video camera.
A survey by Adobe revealed that 87% of video professionals agree that high-quality audio is crucial for audience engagement.
However, this practice creates a challenge: aligning the audio perfectly with the video during post-production.
In a study by Vimeo, videos with better sound quality showed a 60% higher viewer retention rate.
- Starting a New Project: Import both the video file from the camera and the separately recorded audio file into your Adobe Premiere project.
- Selecting the Files: Click to select both the video and the audio files in your project panel.
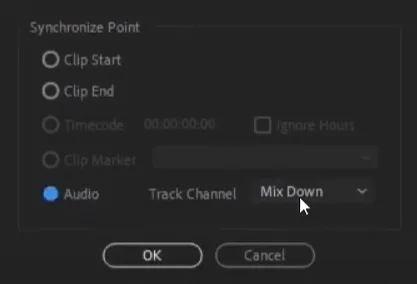
- Synchronization Process: Right-click on the selected files and choose ‘Synchronize’. In the dialogue box that appears, select ‘Audio’ and then choose ‘Mixed Down’. This instructs Premiere to use the audio tracks to align the files.
- Adjusting the Sync: Once you click ‘Okay’, Adobe Premiere will analyze the audio from both sources and align them based on the sound waves. This process ensures that the audio is in perfect sync with the video.
- Refining the Edit: After synchronization, you might find that the audio from the camera is no longer needed. To remove it, right-click on the video file and choose ‘Unlink’ to separate the audio from the video. Then, simply delete the unwanted audio track.
- Finalizing the Sync: Once you’re satisfied with the synchronization, link the video and the preferred audio track by selecting them, right-clicking, and choosing ‘Link’. This ensures they move together during further editing.
Why Synchronize Audio and Video?
In the realm of video production, the synchronization of audio and video is a cornerstone of creating content that is both engaging and professional. This crucial process hinges on two key factors: improved audio quality and editing flexibility.

While in-camera microphones provide a baseline audio capture, external microphones excel in delivering clearer and more dynamic sound, essential for enhancing the overall viewer experience.
In a study by Vimeo, videos with better sound quality showed a 60% higher viewer retention rate.
Additionally, recording audio separately offers unparalleled flexibility in post-production editing. This separation allows for meticulous adjustments in sound levels, the addition of various audio effects, and the ability to switch seamlessly between different audio sources.
These elements combine to elevate the quality of the final product, ensuring that the audience receives a harmonious and immersive audio-visual experience.
- Improved Audio Quality: External microphones generally capture clearer and more dynamic sound than in-camera microphones.
- Flexibility in Editing: Separate audio recording allows for more control during the editing process, enabling adjustments in sound levels, adding effects, or switching between audio sources.
Conclusion
Synchronizing audio and video in Adobe Premiere is a vital skill for any video editor looking to produce professional-quality content.
By following these steps, you can ensure your videos have crisp, clear sound perfectly aligned with the visual elements. Remember, the key to engaging content is not just what the audience sees, but also what they hear.


